 Watch to see how (2:23).
-
Install the OneStream Smart Integration Connector Local Gateway Server (OneStreamSmartIntegrationConnectorGateway-#.#.#.#####.msi) on a Windows Server 2019+ in your environment.
NOTE: If you connected to a database using a custom database client, including OracleClient Data Provider or Oracle Data Provider for .NET, you will receive an alert asking to reconfigure these connections. Reconfigure the existing connections to use ODBC Data Provider, OleDB Data Provider, or a Custom DLL. See Connect a Local Gateway to a Data Source.
-
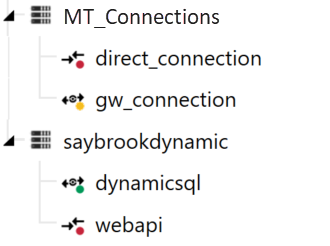
Create a Smart Integration Connector connection in the OneStream Windows application to connect OneStream Cloud instance to a Local Gateway on the Local Gateway Server.
-
Export the connection configuration and import this configuration to the Gateway Settings in the OneStream Local Gateway Configuration.
-
For Database Connections:
-
Define a Local Gateway connection including Data Sources through the OneStream Local Gateway Configuration.
-
Test any configured Data Sources to confirm they are communicating properly.
NOTE: Testing direct connections may involve building test business rules to perform proper validation.
-
Define a custom database connection in the OneStream System Configuration Setup.
-
When installation is complete, you can access remote data sources using business rules, member formulas, or dashboard data adapters in OneStream through the Smart Integration Connector.
Smart Integration Connector Terms
The Smart Integration fields define the gateway. You can find more information about this below.
| Term | Definition |
|---|---|
| Relay Name | Refers to the internal namespace of the relay service that is responsible for managing the data flow for all defined Gateways. For example, arn-mysite.servicebus.windows.net. |
| IPv4 Whitelist | Contains the list of IPs or CIDR addresses that are allowed to transfer data through Smart Integration Connector. |
| Name |
The name of the connection. Names are completely arbitrary and typically refer to the region (North East) or data source such as (SAP). The name cannot be changed once created, and they must be unique across all environments—both development and production. You can delete an existing connection and recreate it with a new name. |
| Description | Text describing the role and purpose for the connection and the data sources to which it is connecting. |
| Gateway Server Name | Use for display and organizational purposes only. This is the name of the gateway server associated with the connection. You can select an existing gateway server or enter a new one. |
| Web API Key (Gateway Connections only) |
This is an editable field. You can change your key as needed. If changed, it must also be changed in the Smart Integration Connector Local Gateway Server. It is designed to offer an additional layer of protection within your network when invoking APIs embedded in the Smart Integration Connector Local Gateway Server. The purpose of the Web API Key is to give you full control on who can access the data sources in your network. |
| Gateway Key | This is the cloud key used to authenticate the Smart Integration Connector gateway to the customer OneStream environment. This key can be rotated in the OneStream application by Smart Integration Connector Gateway administrators and must be the same in both the remote Gateway service and in OneStream. |
| Status | Value will be Online if the local connection is running and returning heartbeat messages back to OneStream. If the Smart Integration Connector Local Gateway Server is unavailable, stopped, or network connectivity is interrupted, it will display Offline. |
| Status Indicators
|
Status indicators in the list of connections provide a visual indication of the Connection status.
|
| Instance Count |
Displays the number of active gateways. Up to five active gateways per environment are supported. This can be increased by contacting Support. |
|
Version (Gateway Connections Only) |
Displays the Smart Integration Connector Local Gateway Server version. This version may be different from the deployed version of OneStream and allows administrators to observe and monitor versions of Smart Integration Connector Gateway software deployed. |
| Active Local Gateway Server Computer Name (Gateway Connections Only) |
Displays the computer name of the current active Local Gateway Server that is connected to the Relay. |
| Active Local Gateway Server Operating System (Gateway Connections Only) |
Displays the operating system of the current active Local Gateway Server that is connected to the Relay. |
| Bound Port at Gateway | Remote port bound to Gateway endpoint. Gateway Connections default to 20433 and should not be changed without consulting support. Direct Connections allow any port running on a remote host to be used. This port represents the well-known TCP service to expose from an on-premises host such as sFTP, which would equate to port 22. |
|
Remote Gateway Host (Direct Connections Only) |
Remote port host to Gateway Server. Used if surfacing an endpoint such as an SFTP Server. This could be the hostname or IP address on the network that the Gateway Server resides in. For example: 172.168.4.7 or sftp.mycompany.com |
|
Bound Port in OneStream (Direct Connections Only) |
The internal port that OneStream uses for secure communications with Direct Connections. The port must be globally unique for every connection in the deployment environment. The port number must be greater than 1024 and less than 65535. The recommended best practice is to automatically assign an available port number when the gateway is created. To automatically assign an unused port, select (Auto Assigned). The port can be referenced in data management or business rules to directly access services such as sFTP and WebAPI. |
| Gateway failures reporting interval (min) | Minutes to wait between reporting connection failures into the OneStream Error Log. The default is five minutes and the max is 1440 minutes. If a connection is unreachable, an item is put in the error log using this interval value in minutes and the minutes can be adjusted. |
Local Gateway Server Installation
Smart Integration Connector is available in OneStream from the System > Administration tab.
-
Download the Smart Integration Connector installer (OneStream_Connector_#.#.#.zip) file from the Platform section of the Solution Exchange.
-
Copy the Smart Integration Connector Local Gateway Server installer to a Windows Server within your environment.
-
Run the installer as an administrator. Accept all the default prompts. When completed, the Local Gateway Server will be installed on your Windows Server.
IMPORTANT: If you are upgrading, you must follow steps 4-7.
-
Run the OneStream Local Gateway Configuration Utility.
CAUTION: If using a custom database provider, ensure that an equivalent .NET 10 provider is installed and the Smart Integration Connector data source is reconfigured.
-
The XFGatewayConfiguration.xml file will open by default.
IMPORTANT: Do not change the name of the XFGatewayConfiguration.xml file. The OneStream Smart Integration Connector Gateway Service only references this XFGatewayConfiguration.xml file upon start-up. The Save As functionality is used to create a backup of the file. It is best practice not to rename, move, or change the location of the XFGatewayConfiguration.xml file. If the configuration file has to be opened from another location, then it will need to be opened from this other location again after the upgrade.
-
Save the configuration file.
-
Follow the dialog prompts and restart the service.


